Knowledge & Education
Make STEM Fun: Tools Your Science-Loving Kids Can Benefit From
For children, the world is an exciting place, one they’re eager to explore. As soon as they learn to talk, they start asking questions about their surroundings, trying to make sense out of everything around them. Yes, kids are incredibly curious by nature. No wonder many of them pick science and math as their favourite subjects in school.
If you’re a proud parent of a science-loving young person, nurturing this passion of theirs is definitely something you need to consider. Whether your child becomes a professor of cell biology or they decide on an entirely different field of study (one that has little to do with STEM), developing and improving their science skills in a fun, real-life, hands-on way outside the classroom is certainly something they can benefit greatly from. Why? Well, simply because science is relevant to everyone. Here’s a list of tools that can make this learning adventure a lot easier for your kid.
Microscopes
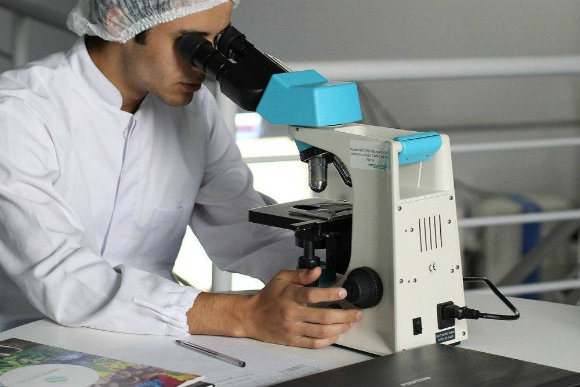
It goes without saying that microscopes are extremely useful scientific tools. As you may already know, a microscope is an instrument that magnifies objects that are too small to be seen with the naked eye, whereas micrographs are pictures taken using such an instrument. With the help of a high-quality microscope, your child can observe some of the tiniest parts of the living world: cells, bacteria, algae, and protozoa. This is a great way to start understanding the world around them.
When it comes to buying a microscope for your young one, you should know that there are many different types. Simple microscopes, for example, are in fact magnifying glasses. They’re called ‘simple’ because they have just one lens. Compound models are probably what most people have in mind when they talk about these scientific devices. They have multiple lenses that are arranged in a way that enables them to bend light to produce a much more magnified image compared to that of a magnifying glass. Keep in mind that it’s impossible to see molecules and atoms using compound microscopes because they are too small. Electron microscopes are specifically made for this task.
Today, most classrooms are equipped with light microscopes. When these instruments are used, visible light passes through the biological samples and it is bent through the lenses, allowing the user to see magnified images of the specimens. One of the most amazing things about light microscopy is the possibility to watch living cells migrating or dividing (you know, carrying out their normal behaviours). Your child can learn a lot about the astonishing variety of life on Earth by comparing individual cells of plants, animals, bacteria, and yeast in the comfort of your home. No pressure, just fun.
Nowadays, digital microscopes are in high demand. They usually come with cameras and USB ports, taking technology on a whole new level. Digital microscopy allows the user to magnify and measure images in real-time. By capturing real-time images, the user can observe a specimen over a long-time period and follow the visual progression of the sample’s life. Furthermore, thanks to the use of USB cameras, storing and transmitting images for future viewing is possible as well. This can come in handy for your kid’s science fair projects. Luckily, there are plenty of digital microscopes for sale at affordable prices.
How to use a microscope?
Since light microscopes are widely used and are more practical for casual use than alternatives like electron microscopes, I decided to focus on them. You can learn (and later teach your child) how to use one by following these two steps:
Step #1: Set up your slide
First of all, connect your instrument to an outlet if it uses an illuminator. If it uses a mirror instead of an illuminator to focus natural light onto your specimen, skip this part.
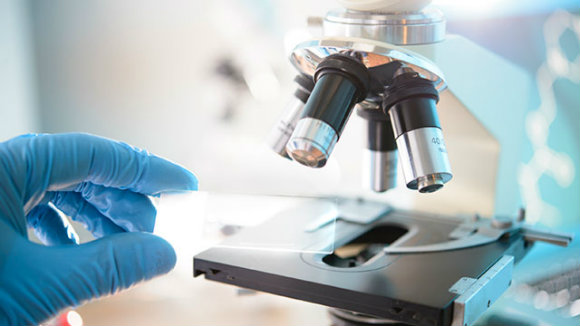
The next thing you need to do is rotate the revolving nosepiece to the lowest power lens (the one shortest in length). Be careful when you do this in order to avoid breaking or wearing down the nosepiece.
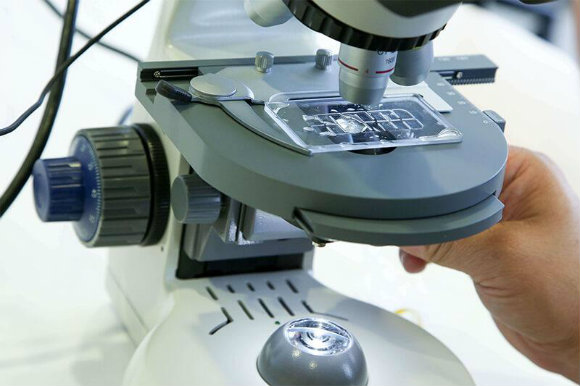
Once you finish the previous part of this step, cover your sample slide with a glass cover or coverslip and mount it onto the stage using its metal clips. In case you don’t know, the stage is a square, flat surface underneath the lens. It comes with two parallel metal clips.
The final part of this step is to rotate the focus knob until the objective lens hovers over the specimen slide. The focus knob is the large knob located to the right of this scientific tool. When it’s turned, either the lens or the stage moves. Please remember that the focus knob shouldn’t touch the glass cover.
Step #2: Adjust the light and focus
Start this step by moving the slide around with one hand until the image is in the centre of your vision. Stop when you see the clearest image. After this, adjust the mirror under the stage until it reflects the maximum amount of light onto the specimen. In case your instrument has an illuminator instead of a mirror, you need to rotate the rim around the condenser located underneath the stage for maximum light exposure.
Adjusting the coarse and fine adjustment knobs until you get a focused image is the next part of this step. As you do this, look through the eyepiece. Turn the coarse adjustment knob so that the objective lens moves upward and away from the specimen until the image comes into focus.
Before you start examining your specimen, you might want to make final focus adjustments by adjusting the fine focus knob. This is how you’ll increase the clarity of the image. Once you’re done, the excitement begins! According to professionals, you need to keep your eyes open (yes, both of them) in order to avoid straining them.
Please remember to turn the objective lens knob until it is at the highest point from the slide, turn the nosepiece to the lowest power lens, and remove the specimen once you finish examining it. Covering the instrument is also a good idea.
Measuring tools
When it comes to collecting data, precision is a must. That’s exactly why your potential scientist needs a stopwatch (to measure time), a scale (to measure weight), a ruler or a measuring tape (to measure length or distance), a thermometer (to measure temperature), and a graduated cylinder (to measure the volume of a liquid).
Tools used for experiments
If your kid is old enough to conduct experiments or you plan to do it together, getting a Bunsen burner is definitely something you need to consider. A Bunsen burner, named after Robert Bunsen, is a small adjustable gas burner typically used as a source of heat. Since it uses an open flame to raise the temperature of a substance, you need to operate it with care. Make sure your child wears safety goggles when using this tool.
Glassware is a must as well. A test tube, for instance, is ideal for small liquid samples, whereas beakers (wide-mouthed containers with a flat bottom) and flasks (narrow-mouthed containers with a flat bottom) come in handy when one has more liquid. Your young scientist can use these tools to store and mix liquids.
Other science tools
Charts, clipboards, notebooks, pencils, markers, calculators, forceps, and droppers are only some of the many other science tools that can make things a lot easier for your science enthusiast.